Showing posts with label repurpose and refashion. Show all posts

Tuesday, April 1, 2014

Egg Carton Easter Chick

Egg Carton Easter Chick

A little egg carton chick to hide some chocolate Easter eggs = Cuteness overload.  Seriously.  And while these egg carton Easter chicks are perfect for kids to put together, adults will have just as much fun helping – at least I did.  And the best part of all is that you probably already have all of the supplies needed for this one.

Egg Carton Easter Chick

Supplies Needed:  Paper egg carton, yellow paint, tape, colored paper, feathers (optional), black marker.
1) Cut two egg holder pieces (do these have a technical name?) from the carton.  2) Paint.  3)  Attach the two pieces together with a piece of tape to create a hinge.  4)  Use colored paper to make the beak, feet, and wings (or use feathers for wings, as shown).  5)  Draw on a pair of eyes. 6)  Fill with candy and give to your best peep.

Egg Carton Easter Chick

Happy Easter crafting, DIY’ers!

~julee~

Watch the video as I demo how to make recycled egg carton chicks on WDRB in the Morning:

Wednesday, March 26, 2014

Today’s Woman March 2014 Cover

Today's Woman March 2014

You know what’s weird to say?  Well, Hey, I’m on the cover of a magazine!, for one thing. 

So (enter weird voice), I’m on the March 2014 cover of Today’s Woman magazine.

Yep.  No matter how many times I’ve said it this month, or talked about, or showed it off, it’s always weird.  But a good weird.  Like a weird and humbled kind of weird.  Know what I mean?

Today's Woman March 2014

You may have seen the announcement if you follow me on Instagram, but I thought I should maybe blog about it too before the month is over and the issue leaves the newsstands.  Not because I’m a braggart by any means, but because holy amazeballs people, how cool is this dress I’m modeling??  I’ll be honest and tell you that I am still totally geeking out that I was asked to model this amazingly fun paper dress. 

The issue is all about repurposing, and the genius creatives at Today’s Woman made this fabulous dress out of their past magazine covers.  I can’t think of anything more perfect for me to wear on the cover of a magazine.

Today's Woman March 2014

Most exciting is that I am featured among many other local reuse and repurpose artists.  These ladies have skill and artistry that is truly awe-inspiring.  Like my good friend Lynn Quire of Good Garbage who has dedicated the past year to opening Louisville’s first reuse store and creating a non-profit where children are given the opportunity to participate in reuse art classes and educators have access to free supplies for their classrooms.  I feel honored to be featured with such talented community influencers.

Today's Woman March 2014

Oh, and hey look, I’m on the inside too, showing off one of my repurposed coffee sack totes.  Yes, this may be first time I’ve ever had my hair curled and worn fake lashes, and no, you’ll never catch me wearing so much makeup again.  This entire experience has been wonderful, and I’m so grateful for the staff at Today’s Woman for letting me be a part of their publication this month.

Happy repurposing, DIY’ers!

~julee~


You can see the full online version of March 2014 Today’s Woman here:

Sunday, January 12, 2014

Video: Repurposed Jewelry Organizer

I was invited on WDRB in the Morning this week to show how to make this fun and easy repurposed frame jewelry organizer.  All you need to make your own is an old picture frame, mesh screening or chicken wire, and some hooks or knobs.  Assemble it all together and it makes the perfect organizer for your earrings, necklaces, and bracelets.

Craft E Magee and I are on WDRB twice monthly showing simple, affordable crafts you can make yourself.  Check out D.I.Y. Louisville’s event page for our next appearance.  And, as always, you can watch our videos on YouTube.

Thanks for watching!

~julee~

Wednesday, January 8, 2014

DIY Jewelry Organizer Display

DIY Jewelry Organizer Display

At first glance you might be thinking, wow, she needs  more earrings, but on second glance you should be thinking, wow, I can totally make that, because you can.  Creating a unique jewelry display for earrings and necklaces is as easy as grabbing some bits and hardware and repurposing an old picture frame.

With a little bit of ingenuity, you can use pretty much any picture frame you have for this project.  Mine happens to measure 18x15 and is made from wood, so that’s what I’ll be showing here.

DIY Jewelry Organizer Display

Aside from the frame, you will also need mesh screening (purchased from the hardware store), a way to to adhere the mesh to the frame (glue or staple gun), hooks or decorative drawer pulls, and a hanging kit if you want to hang your organizer.  Optional, but if you have some duct tape, grab that, too.

DIY Jewelry Organizer Display

If you want to paint your frame, do that first.  After it dries, measure a length of mesh screening to cover the entire opening of the cutout, plus approximately 1-inch on all sides.  Affix the screen to the back of the frame using glue or staple gun (or in my case, a not-very-fancy typical office stapler).  Be sure to pull the screen as taut as possible.  When you’ve adhered all sides, you may want to go around the edges of the screen with duct tape to cover any pesky sharp edges.  (I forgot to photo that, but I’m sure you can picture it.) 

You can stop here if you’re happy to use your frame as an earring holder.  If you want to also hang necklaces or bracelets, add some knobs or hooks to the frame.  If you’re happy with how it looks, use the holes in the mesh to slip your hanging earrings through and you’re done!

Louisville Locals:  I will be hosting a picture frame jewelry display workshop at Good Garbage on January 26th at 4:30.  The cost is $20 and we will provide a wooden 18x15 frame plus all of the materials you need to create your own jewelry organizer.  Purchase tickets at Eventbrite: https://www.eventbrite.com/e/picture-frame-jewelry-display-tickets-9177898341.  I hope you’ll join us!

Happy organizing, DIY’ers!

~julee~

Tuesday, September 24, 2013

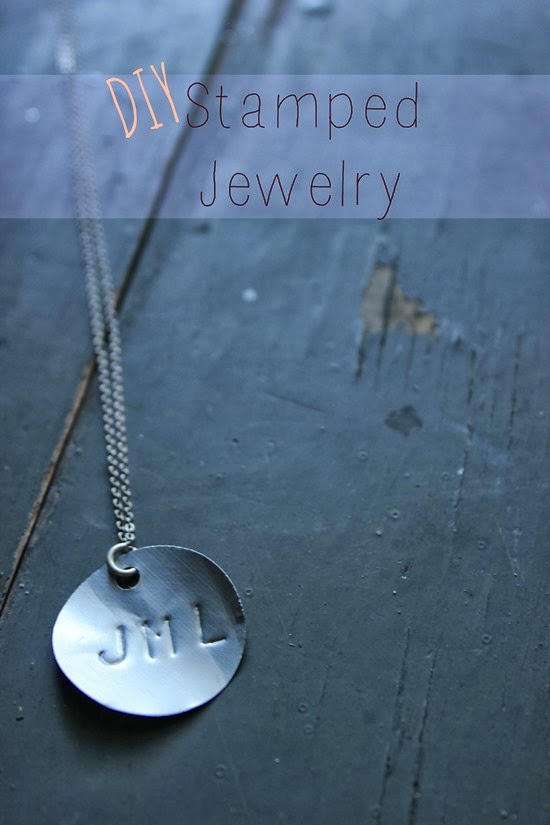
DIY Aluminum Metal Stamped Jewelry

diy-stamped-jewelry

I absolutely love the look of stamped jewelry and accessories, and making your own is pretty easy.  You will need a few tools to achieve the desired look, but they can all be purchased at a craft store (or online).  As you know, I love to use as many recycled items as I can in my craft projects, so this tutorial will show you how you can also make blank charms for stamping out of aluminum cans.
diy-metal-stamp-jewelry-2

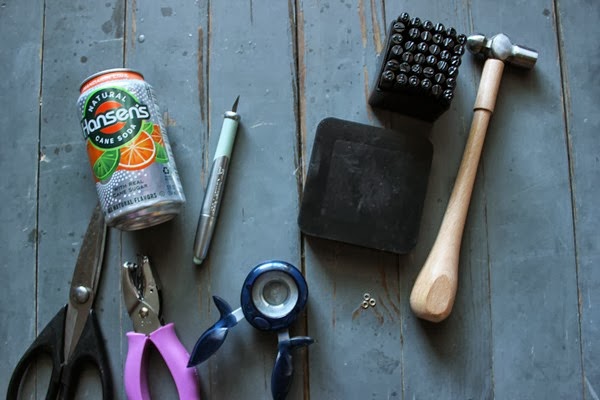
The supplies that you will need to make the blank charms are:  Aluminum can, exacto knife or scissors, circular paper punch, small hole punch.

The supplies that you will need for the metal stamping are: set of metal alphabet stamps, hammer, and metal stamping block. 

You may also need jump rings and a chain, if you’re making a necklace.

diy-aluminum-charm

To create a blank charm from the aluminum can, start by cutting off the top and bottom of the can with your exacto knife or scissors.  After that, you can cut up the middle of the can to create one long sheet of metal.  The aluminum is thin enough for the paper punch to cut through.  Use the circular punch to cut your charm, and use your small hole punch to cut a hole for hanging.

diy-metal-stamp-jewelry-3

Now you are ready to stamp.

diy-metal-stamp-jewelry

Simply lay your charm on your stamping block.  If you want your letters to be perfectly aligned, use a piece of masking or washi tape to be your guide.  (I didn’t, because perfectionism eludes me.)  Lay your letters on top of the charm, and use your hammer to make the imprint.  Because the aluminum is thinner than other metal charms you can purchase, do not go crazy with the hammering or you will bend the charm.  (Unless you are going for that bent-up banged-up look, in which case, hammer on like a crazy gal.)

Now, attach your jump ring and your chain and wear your recycled stamped necklace proudly.

diy-metal-stamp-jewelry

You can also use a black sharpie to fill in your letters if you want them to be more prominent.  Also, use other shapes of paper punches to play around with more designs.  Using the easy-to-cut aluminum really broadens your options and allows you to create unique designs.

Happy metal stamping, DIY’ers!

~julee~

Tuesday, September 10, 2013

DIY Shell Necklace

DIY Shell Necklace

So, I get that fall is practically tomorrow, but I’m still playing with my beloved summer seashells over here.  I’ve organized them, decorated with them, and now, I’m wearing them. 

Creating your own DIY shell necklace is easy.  When collecting shells on the beach, don’t immediately toss back the ones with small holes in them.  They are perfect to use for jewelry making without the need for power tools.  Or, if you don’t have any beach trips planned soon, you can buy shells from Wholeport with the holes already predrilled.

DIY Shell Necklace

To make your own DIY shell necklace, you’ll need a variety of shells with holes and a leather cord.  Also consider adding charms for more interest.  If your shells are in need of holes, you’ll have to break out drill to create them.  The predrilled shells, bronze charms, and leather cord I used are all from Wholeport.  If you use your found shells, wash them in a bleach and water solution and allow to dry beforehand.

DIY Shell Necklace

The length of cord you’ll need will depend on your preference, but you’ll need to add at least two extra inches to ensure it’s not too short after you tie on your shells.  Knot a shell with the cording every inch or so until your necklace is the length you desire.  When I had all of my shells added, I simply tied the ends together on mine, but you can add a necklace clasp if you prefer.  That’s it!  Now you’ve created a beautiful piece of jewelry from your beach treasures.

DIY Shell NecklaceDIY Shell Necklace

You can create many different looks by including a larger variety of shells.  Hanging a single charm or shell on leather cording is also very pretty.

Happy creating, DIY’ers!

~julee~

Tuesday, August 27, 2013

Easy DIY Homework Caddy

Easy DIY Homework Caddy, DIY Chalkboard Caddy, DIY Art Caddy, Recycled Drink Holder Caddy

One of the most dreaded necessary-evils of going back to school is knowing that homework is now an evening occurrence.  I don’t know how things are in your house, but in my house, homework is almost always a fight.  My kid hates homework.  I hate homework.  And the battle that surrounds homework is just plain ugly.  Every new school year I make changes to help this portion of our day go as smoothly as possible. 

This year, my daughter and I made this easy DIY homework caddy to help her keep all of her homework necessities in one easy to find place.  We do homework at our kitchen table, so I needed something that was easy to transport from its storage spot to our homework spot and back again so that cleanup is fast and easy before dinner.  The handles on this caddy makes that transport easy.  Additionally, we painted the caddy with chalkboard paint so that she could make note of weekly reminders.

Easy DIY Homework Caddy, DIY Chalkboard Caddy, DIY Art Caddy, Recycled Drink Holder Caddy

Making a DIY homework caddy is inexpensive and easy – all you need is a recycled drink holder.  Mine happens to be made from bottled sodas, but you can also use a drink holder from a carryout eatery as well. 

Here are the easy steps to follow to make your own chalkboard homework caddy:

Supplies needed:  Recycled drink holder, primer (optional), masking or painters tape (if your container has gaps on the bottom), chalkboard paint, brush or sponge.

Easy DIY Homework Caddy, DIY Chalkboard Caddy, DIY Art Caddy, Recycled Drink Holder Caddy

1)  If your holder has gaps on the bottom, use masking or painters tape to tape it off.  This prohibits your pencils and small items from slipping out.  2)  If you choose, use a primer to cover your holder.  3)  Use your brush or sponge to paint on the chalkboard paint.  If you don’t use a primer, be prepared to paint on extra coats of the chalkboard paint if your holder has a logo or writing.  4)  Let dry.  That’s it!

Easy DIY Homework Caddy, DIY Chalkboard Caddy, DIY Art Caddy, Recycled Drink Holder CaddyEasy DIY Homework Caddy, DIY Chalkboard Caddy, DIY Art Caddy, Recycled Drink Holder Caddy

After your chalkboard paint is dry, you’re ready to write memos and fill your homework caddy with school supplies.  This would also make an awesome art supply caddy!  If you don’t have chalkboard paint on hand, you can always use acrylic paint or spray paint in a fun color and let your kids decorate with stickers or other embellishments.

Easy DIY Homework Caddy, DIY Chalkboard Caddy, DIY Art Caddy, Recycled Drink Holder Caddy

What is your biggest challenge for getting homework completed at your house, and how do you solve it?  Please share your homework tips in the comments – I would love to know what works for your family!

Happy back-to-school organizing, DIY’ers!

~julee~

Tuesday, March 5, 2013

Make It: Jute Wrapped Flower Vase

jute yarn wrapped bottle tutorial #diy #recycled #crafts

Repurposing glass bottles into pretty flower vases is easy with only a few materials.  Simply wrap yarn or jute around the bottle and it’s ready for display.  I love the natural look of jute elements in my décor, but you can also use any color yarn to create a look similar to the ones I made.

jute yarn wrapped bottle tutorial #diy #recycled #crafts

You’ll need:  A clean glass bottle with labels removed (if you don’t want to risk the label peeking out), glue of your choice, and jute or yarn.  Apply a section of glue to the bottom of your bottle and glue down a small portion of your jute/yarn to create a tail.  Hold it for a few seconds to dry and then begin wrapping the jute/yarn around the bottle and over the tail.  Work up the bottle in small batches applying glue then wrapping until you reach the top.  That’s it!

Happy repurposing, DIY’ers!

~julee~

Tuesday, February 19, 2013

Make It: Leather Cuff

leather cuff bracelet tutorial

Know what’s fun? When someone compliments you on something you’re wearing and you blurt out, “I made it!!”. Making your own pretty little leather cuff arm candy is a breeze and only takes a few supplies. Are you ready to be complimented?

DIY Leather Cuff Tutorial
leather cuff bracelet tutorial

1) You’ll need: Leather or vinyl, sew in snaps with thread and needle (or a snap kit if your leather is thick), strong glue (tacky glue, super glue, hot glue, or fabric glue), and a pattern piece. 2) Make a pattern from paper by measuring the length around your wrist, and approximately 2-inches wide (or wider if you like). Cut the leather from this pattern. 3) Pattern pieces: One wrist cuff and one 2inx1/3in piece. 4) Find the middle of the wrist strap and pinch it into a fold. You may add a couple small dots of glue between the folds on the underside. 5) Wrap your small piece tightly around the folds. 6) Glue the small piece tightly on the underside.  Snip off any excess. 7) Add your snaps. My leather was soft and thin, so I could easily use sew in snaps. 8) Finish both sides of your snaps.  9)  Wear it out and brag on your awesomeness.

leather cuff bracelet tutorial

Tips:  You can purchase leather and vinyl at fabric stores, but you may have an old leather item laying around that can be repurposed for this project.  My leather came from a torn leather skirt found at the thrift store.

Do you enjoy making your own accessories?  If you’ve made any lately, share a link to your blog in the comments – I’d love to come check it out!

Happy making, DIY’ers!

~julee~

Wednesday, February 13, 2013

Make It: Last Minute Valentine’s Card

Paper Roll Heart Valentine's

Tomorrow is Valentine’s Day.  Do your kids have their class cards all ready to go?  Just in case you’re scrambling today to make a batch of last minute cards, I’ve come to your rescue.

Lynn of Good Garbage showed us how to easily turn paper rolls into a heart-shaped stamper at our meet up last week.  This works well with a stamp pad, but I found it worked even better with craft paint.  Besides, paint is always more fun to play with.  Use washable paints and this is a perfect kids craft.

You’ll need:  One paper roll (of the toilet paper sort or paper towel sort), craft paint, cardstock or paper.  Crease the bottom of the paper roll, and then fold in the top to get a heart shape.  Dip in paint and stamp on your paper.  That’s all you need for a cute and simple card in an instant.  Here’s a picture tutorial:

Paper Roll Heart Valentine's

I finished my hearts by adding some sweet nothings with my letter stamps.

Paper Roll Heart Valentine's

Happy last minute Valentine making, DIY’ers!

~julee~

Recycled Valentine’s with Good Garbage

D.I.Y. Louisville February meet-up was sponsored by  Good Garbage: Center for Creative Reuse.  Lynn, co-founder of Good Garbage and long time D.I.Y. Louisville member, brought out an assortment of collected recycled objects for our group to use to make Valentine’s cards.

Good Garbage Valentine

Lynn showed us a few ways to recycle everyday objects like wine corks and paper rolls into Valentine’s stamps, and then everyone used their own creativity to make cards for their someone special.  I love how unique they all are.  My favorite cards came from the kids in attendance, as they all seemed to be drawn to these plastic white disks that were a cast-off from a printing company.

A great big thanks to Lynn and Good Garbage: Center for Creative Reuse for spending the evening with our group!  Be sure to visit Good Garbage on Facebook for more information about this exciting art, craft, and educational resource opening soon in Louisville.

~julee~


P.S. – You can find more information about D.I.Y. Louisville Craft Cooperative HERE.  If you or your company would like to donate supplies or sponsor an evening with our group, email me at diylouisville @ gmail dot com.

Tuesday, January 22, 2013

Make It: Stenciled Heart Shirt Tutorial

Freezer Paper Stencil Heart Shirt

I used freezer paper to turn one of my daughter’s heart drawings into wearable art.  I’m a sucker for a child’s imperfections when it comes to arts and crafts.  You can easily turn any drawing or image into a stencil with freezer paper.  Here are the steps:

Freezer Paper Stencil Heart Shirt

1) Gather your supplies.  You’ll need:  Freezer Paper, exacto knife, paint, sponge brush, image you want to cut, and iron (not shown).  2) Place the freezer paper on top of your image shiny side down.  You may need to secure the edges with tape.  Using your exacto knife, carefully cut out the image.  Now you have a stencil of your image.   3)  Iron the freezer paper/stencil on your fabric shiny side down.  This adheres the stencil to your fabric.  Make sure you get a nice seal along all of the edges.  4)  Sponge on your paint.  5)  Allow to dry for 20-30 minutes and remove the freezer paper stencil.  The freezer paper pulls away from the image easiest if the paint is still slightly damp.  However, some paint coverage calls for two coats in which case you’ll want to pull the paper off very carefully.

Freezer Paper Stencil Heart Shirt

Ta-da!  You now have a 100% personalized heart shirt for Valentine’s day!

Happy Valentine crafting, DIY’ers!

~julee~

Wednesday, December 19, 2012

Last Minute Wrapping

gift wrap

If you find that you’re down to the last minute and have run out of a few gift wrapping essentials, don’t fret; You probably have a few items on hand that you can use in a pinch.

gift wrap

Paper bags make the perfect gift wrap and they pretty much give you a blank canvas to create any look you want.  Plus, recycling is just a cool thing to do.  Cut your bag open, flip any logos to the inside (if you want), and now you have the perfect wrapping paper base for drawing, doodling, stamping, painting, and creating your own custom look.  Of course, leaving the brown paper  au naturale is pretty, too. 

Creating snowflakes from white paper or coffee filters is as easy as a few snips from your scissors, and they look pretty atop any package. (Tutorial coming soon!)

gift wrap

You can create the look of ribbon from thin strips of wrapping paper or any colored paper.  Cool maps or magazine photos can be cut and used for adornments or gift tags.  If you prefer more traditional gift tags, you can print them right from your computer.  These free printable gift tags from D.I.Y. Louisville member Patty of All’s Fair in cookies and crafts are super adorable.


Do you have any favorite last minute or recycled gift wrap ideas?  I'd love to hear your ideas and I’m always looking for new inspiration, so please feel free to share in the comments.

Happy gift wrapping, DIY’ers!

~julee~

Sunday, October 7, 2012

Easy Halloween Photo Booth

halloween photo booth

I love photo booth photos.  Creating your won pseudo-photo booth for a party is really easy and adds a huge element of fun, especially for Halloween parties when guests are already dressed up in costumes. 

To create this Halloween photo booth, we hung a (wrinkled?) backdrop, and I made a spooky spider frame for the prop.  To create the Halloween frame, I used bright orange spray paint on a thrifted picture frame, created a simple BOO pennant, and strung cobwebs with a plastic spider in the corners.  So easy, and so much fun for our party guests!

halloween photo booth

Ok, so maybe I had more fun than the kids, but I love the sweet photos of these girls “framed” in their costumes.  Adorable.

halloween photo booth

Happy Halloween photo fun, DIY’ers!

~julee~

Monday, July 9, 2012

Monday Magazine Challenge: Vacation Jars

vacation jars

In the Martha Stewart Living August 2012 issue, there was a little feature on making vacation jars from the little bits and treasures that are collected during your travels.

vacation jars

I was inspired to pull out the bag of shells and ocean treasures we collected on our vacation this year and create similar keepsake jars. 

I just happened to have three baby food jars on hand and half a can of aqua spray paint for the lids.  My daughter was right on board with this little project and she had fun rinsing, sorting, and reminiscing about her favorite finds from the beach.

vacation jars

While my daughter is indiscriminate about her accumulations, I personally collect shark teeth and the teeniest, tiniest shells I can find.  Hunting for these things satisfies my OCD tendencies just nicely.  Next year I’ll give my daughter a new jar and have her fill it with her favorite finds before we leave for home.  That way, we don’t have a surplus of shells that I don’t quite know what to do with.

How do you store your seaside keepsakes?  Would this simple idea work for you?  Any other ideas for sea shells?  I have a giant bag of shells still, so please leave a comment letting me know what works for you!

~julee~

Thursday, July 5, 2012

D.I.Y. Headboard

I’m going to tell you something kind of embarrassing.  My husband and I will be married for 10 years next month and in these last 10 years we have never had a headboard.  Yep, we’ve been living like poor college students, at least as far as bedroom furniture goes.  Well, recently opportunity came a knocking in the form of a giant, old shipping crate set out for trash day.  We grabbed it up (I’m not embarrassed for my neighbors to see my digging through their trash) and repurposed it.  The crate part became a new side table in our living room (more on that later) and the lid to the crate became our new perfect headboard.  All we did was attach the lid to the wall above our bed using screws and making sure to drill into the studs.  After it was attached we screwed some bull nose clips, added our favorite pictures and called it a day!  Check out the pictures.  I’m in love with the way our new headboard looks and am glad it took us 10 years if this was the final product.
headboard4
headboard3
headboard2
headboard

* A little tip for the bullnose clips is if you can only find the magnetic kind, get them anyways.  the magnets pop out very easily with a blunt knife.

-Kim


Linking up with The Shabby Creek Cottage.