Showing posts with label tutorial. Show all posts

Tuesday, March 20, 2018

DIY Mini Kentucky Derby Hat

Mini Kentucky Derby Hat

Sure, Kentucky Derby hats are notoriously big and loud, and perhaps (with all due respect), a tad bit ostentatious. If you're in the stands at Churchill Downs on Kentucky Derby day, your hat better be blocking someone else's view of the track or you're doing it wrong.

So, if that's the case, you're probably wondering why you would ever need to make a mini Kentucky Derby hat. Well, I have a few ideas. For a doll, maybe, or even say, to top an Easter egg. Maybe you just like cute mini sized things. Whatever your reason, I'm going to show you how easy it is to make your own extravagant hat in a small size package.

DIY Mini Kentucky Derby Hat

For the hat itself, you'll need to gather some supplies: cardboard (I used a shirt box), a round glass or other object as a template, cotton stuffing or cotton balls, pencil, scissors, and a glue gun.

DIY Mini Kentucky Derby Hat

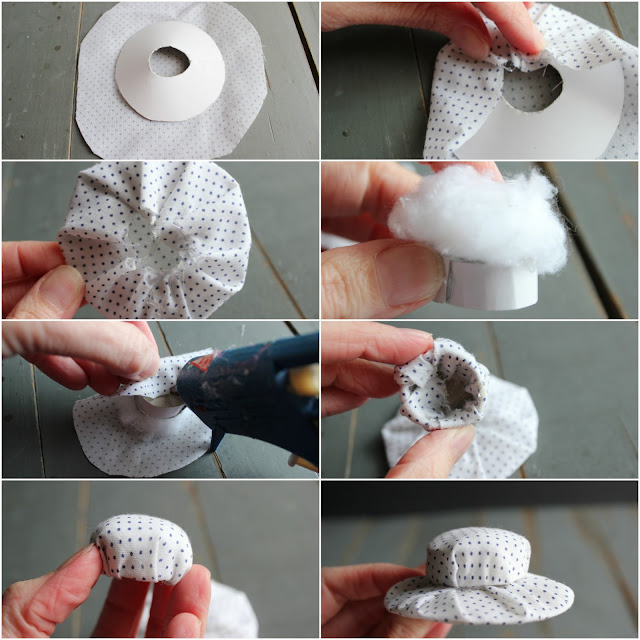
The circle size for the hat brim will depend on what size hat you want to make. Using the glass, trace a circle on the cardboard. Cut the circle, and then make a slit to cut a small circle from the center.

Overlap and glue the slits together on the brim piece to create a curve for the brim. (The bigger the overlap, the bigger the curve, or wave.)

Cut a half-inch wide strip of cardboard long enough to fit the center circle cutout. Glue the strip to the center cutout. Now you will have the two pieces of the hat and you will cover each of these with fabric separately.
DIY Mini Kentucky Derby Hat

For the brim, cut a circle of fabric large enough to cover the entire cardboard piece. Pull the fabric up tight and glue around as you go. Unless you use a stretchy fabric, you will create a pleated look. If you don't want a pleated look, use a stretchy fabric.

For the hat top, glue the cotton to the flat top piece and then cover with fabric the same way as you covered the brim: pull up tight and glue to the inside center.

Now, glue the top and brim pieces together. If it doesn't look perfect, don't stress. We're going to use embellishments to create a flawless look.

DIY Mini Kentucky Derby Hat

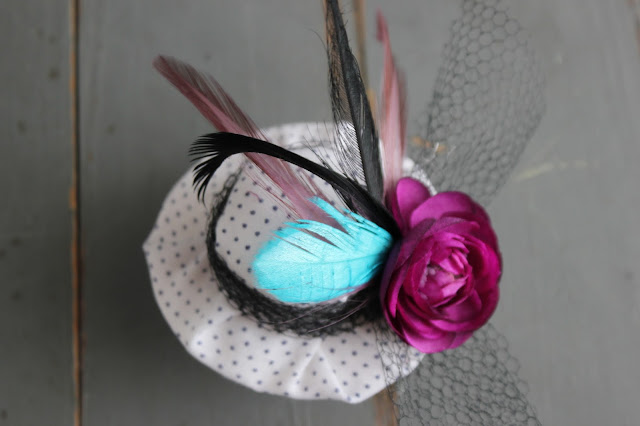
Now that you've got a complete hat, it's time to decorate. Kentucky Derby hats are traditionally decorated with lots of big colorful flowers and feathers. There's no right or wrong when it comes to embellishments, and the more, the better! I've chosen to use tulle, a silk flower, and a variety of feathers.

DIY Mini Kentucky Derby Hat

I used the tulle to create a band around the hat. (Hint, this also hides any unsightly flaws created when gluing the top and brim together.) Play around with your flowers and feathers until you get the look you want and use hot glue to secure everything in place.

That's it! A small Kentucky Derby hat big on traditional revelry!

DIY Mini Kentucky Derby Hat

Happy hat making, DIY'ers!

~julee~

Friday, December 22, 2017

DIY Mason Jar Photo Holder

DIY Ball Mason Jar Photo Holder

It's not too late to craft some last minute gifts this Christmas. These Ball jar photo holders come together quick. Seriously, you make four of these in an hour or two. That, and they're cute and can be personalized with photos and gift cards. Win, win, win.

DIY Ball Mason Jar Photo Holder

Supplies needed: 4oz mason jar, craft snow, small bottlebrush trees, wire (I used 18 gauge). You'll also need a small nail, hammer, wire cutter, pliers, and hot glue. It'll be helpful to find something round to wind your wire around to help it take shape - I used a thread spool.

(I found the 4oz Ball jars at Walmart and Kroger. They come in a 4-pack.)

DIY Ball Mason Jar Photo Holder

Start by creating the photo holder in the lid of the mason jar. Using a small nail, hammer a hole in the center just large enough for the wire to slip through. Create two loops with the wire (twisting around a round object makes this easier). Create a long tail at the end of the wire loop. Thread this through the hole in the lid and then bend a 90-degree angle on the underside of the lid. Use hot glue or similar to secure the wire underneath.

DIY Ball Mason Jar Photo Holder

DIY Ball Mason Jar Photo Holder

DIY Ball Mason Jar Photo Holder

DIY Ball Mason Jar Photo Holder

DIY Ball Mason Jar Photo Holder

Once your lid is finished, create your winter scene inside the mason jar. Use hot glue to adhere the bottle brush trees and then sprinkle in the craft snow. 

DIY Ball Mason Jar Photo Holder

Screw the lid back on and add your photos or cards and you're done! Easy, cute, and personalized!

What last minute crafts are you making?

Happy holiday crafting, DIY'ers!

~julee~

Friday, March 14, 2014

Gold Dipped Wine Glasses

Gold Paint Dipped Wine Glasses

When planning for my Oscar Party, I knew it was the perfect time to jump on the gold painted wine glass bandwagon and create some fancy-pants glasses for the occasion.  I found these affordable stemless wine glasses at Ross Dress for Less that were perfect for the look I wanted.

Pinterest is full of some really great ideas, but my favorite look (and seemingly most popular pin) was Martha Stewart’s gilded glasses.  Dipping the glasses creates an easy, smooth finish that’s hard to recreate with a brush or sponge.  Only, to create Martha’s dipped look, she instructed you to use heavy-duty clamps, and some sort of hanging contraption so the excess paint will drip off of the glass flawlessly.  Now, I don’t know about you, but even as a crafty gal with a room full of crafty hoard, I don’t own either of these things.  And I had no desire to buy or build them, either.

So here is my alternative method for creating a similar look, without the need to hang the glasses for drip-drying.

Gold Paint Dipped Wine Glasses

Gold Dipped Wine Glasses

Gold Paint Dipped Wine Glasses

Supplies needed: Wine glasses, gold glass paint, washi or painters tape, exacto knife, bowl or container that will accommodate the wine glass (I used a paper bowl), and a drying rack or small items to sit the glasses on while they drip dry (I used tealight tins turned upside down).  You’ll also want some newspaper to cover your workspace.

Gold Paint Dipped Wine Glasses

1) Tape off the bottom of the glasses.  2) Use the exacto knife to cut off the excess tape so that only the bottom is covered. 3) Dip the glasses in the gold paint, coming up the sides to create the look you want.  Shake off as much excess paint as you can for at least 30-seconds.  4) Set the glasses on your drying piece(s). 5) Let dry before removing the tape from the bottom.  6) If you still have globs of paint on the bottom, use a scraping to tool to smooth.  7) Refer to the directions on your paint for curing time and procedures.

If you want more paint on the bottom or other side of the glass, you can do that.  If you want a more uniform look to each glass, use painters tape to create those lines. 

Gold Paint Dipped Wine GlassesGold Paint Dipped Wine Glasses

Have you attempted to paint or dip wine glasses?  What are your best tricks for getting a smooth finish?  I’d love to hear your tips and see your pics!

Happy glass painting, DIY’ers!

~julee~

Watch me demo this project on WDRB in the Morning:

Tuesday, February 18, 2014

DIY Mardi Gras Mask

DIY Mardi Gras Mask #diy #mardigras #halloween

It’s true, my little family loves Mardi Gras.  We travel to Louisiana every year to visit and celebrate Mardi Gras (family friendly style) with dear friends and it might be our favorite trip of the year.  This year, I’m making a special mask to match the beads that I’ll be receiving (at the very family friendly parades, people). 

Making your own Mardi Gras mask is easy and you can customize it however you like.  I chose the traditional purple, green, and gold of Mardi Gras fare, but there is an abundance of colored feathers at craft stores for you to choose from if you’re wanting to create something similar for a masquerade or Halloween.

 DIY Mardi Gras Mask

DIY Mardi Gras Mask #diy #mardigras #halloween

Supplies needed:  Plain mask, glitter, glue, sponge or brush, feathers, decorative trim and embellishments, small piece of felt, hot glue.  Optional:  wooden dowel or skewer, ribbon.

My masks came with an elastic band.  I wanted to hold my mask rather than wear it, so I removed the elastic.  This is your preference. 

DIY Mardi Gras Mask #diy #mardigras #halloweenDIY Mardi Gras Mask #diy #mardigras #halloween

DIY Instructions:  To start, brush glue over the entire surface of your mask.  Do not miss any spots.  If your glue is too thick to spread easily, slightly dampen your sponge or brush.  But don’t add too much water, or you might not get a good glue coverage – I learned this the hard way.  You can hold your mask up to the light from behind to check for any missed spots.

Once you have a good solid coverage of glue, add your glitter.  This is the messy and fun part.  I use two sheets of paper so I can catch and reuse (re-sprinkle?) the glitter that doesn’t adhere.  Once you have a fully glittered mask, step away while it dries.  Step.Away.  Maybe 20-30 minutes or more.

After the glue and glitter have dried, add your trim.   If you want to add jewels or other embellishments, now’s the time to do that, too.  This sequence trim is sold by the roll and you may need to look near the fabric notions at your craft store.  It is perfect for this project because it will bend around the curves of the mask more easily than ribbon.  I used tacky glue to adhere it.

Now for adding feathers.  You can just glue the feathers to the back of the mask.  Be careful if you’re using hot glue since these plastic masks may melt with the heat.  However, I created my entire feather piece separate by first gluing the feathers to a small piece of felt.  This gives you more control of the feather placement.  Then, you can add the entire feather piece to the back of the mask. 

To make the mask handle, I wrapped ribbon around a wooden dowel, and used hot glue to affix it to the back of the mask. 

DIY Mardi Gras Mask #diy #mardigras #halloweenDIY Mardi Gras Mask #diy #mardigras #halloween

Laissez les bons temps rouler, DIY’ers!

~julee~

Monday, February 10, 2014

DIY Valentine Bunting

DIY Valentine Bunting with Doily

Creating a sweet Valentine bunting is easy and you’ll only need a few supplies to create your own lovely pennant.  Doilies are the perfect accessory to add romance to your Valentine’s Day décor, but instead of using them directly on the bunting, I’m using the pattern in the doily to create a stencil effect on the paper.  So much more fun to use paint!

DIY Valentine Bunting with Doily

Supply list: Cardstock, craft paint, brush/sponge, doily, hole punch, string, embellishments, and glue (optional). 

To make: Cut the cardstock to your preferred size.  Use the doily as a stencil and dab the paint on to the cardstock.  To get clean lines, make sure to dab up and down instead of painting in strokes.  Once the paint dries, affix your embellishments.  My letters had an adhesive backing and were easy to attach.  Make holes in the corners of each flag, and thread your string through.  Next, hang and enjoy!

DIY Valentine Bunting with DoilyDIY Valentine Bunting with Doily

Happy Valentine crafting, DIY’ers!

~julee

Sunday, January 26, 2014

Video: Matchbox Valentine

This week on WDRB in the Morning, I showed viewers how easy it is to turn a matchbox into an adorable personalized Valentine.  And then Sterling ate the chocolate.  Good times.  Watch and see.

~julee~

PS – You can see all of my WDRB in the Morning segments on my YouTube channel.

Tuesday, January 21, 2014

DIY Matchbox Valentine

DIY Matchbox Valentine Craft

I am so very in love with these little matchbox Valentine boxes.  With so many ways to embellish them, I think I could sit and make them all day.  Addicting little guys, and so easy to put together.  Perfect for a sweet treat or tiny love note to your sweetheart. 

DIY Matchbox Valentine Craft

To make your own, you’ll need a box of strike anywhere matches, and paper to cover the top of the box.  Then, gather some lovely embellishments.  For these, I used Valentine ribbon and heart decals. 

DIY Matchbox Valentine Craft

Cut a strip of decorative paper the same size as the top of your box.  Mine was 2x4.  You don’t have to take the top of the box apart to adhere your decorative paper, but I found that doing so gave a tighter and cleaner fit.  Use a glue stick to adhere your paper to the box top and use the folds in the original box to refold and reglue the box together.  If kids are making these, you can definitely let them make these the easy way and just wrap the paper around the box and glue.  Once that’s done, go crazy with the embellishments.

DIY Matchbox Valentine Craft

And I prefer my Valentine’s to come with chocolate.  Who’s with me?

DIY Matchbox Valentine CraftDIY Matchbox Valentine Craft

So this is my version of matchbox Valentine’s.  How would you decorate your matchboxes?  If you’re in the Louisville area, you can join the D.I.Y. Louisville group on Sunday, February 2nd where we’ll be decorating these little cuties.  See our Facebook event for more details, pricing, and to RSVP.

Happy Valentine making, DIY’ers!

~julee~

Wednesday, January 8, 2014

DIY Jewelry Organizer Display

DIY Jewelry Organizer Display

At first glance you might be thinking, wow, she needs  more earrings, but on second glance you should be thinking, wow, I can totally make that, because you can.  Creating a unique jewelry display for earrings and necklaces is as easy as grabbing some bits and hardware and repurposing an old picture frame.

With a little bit of ingenuity, you can use pretty much any picture frame you have for this project.  Mine happens to measure 18x15 and is made from wood, so that’s what I’ll be showing here.

DIY Jewelry Organizer Display

Aside from the frame, you will also need mesh screening (purchased from the hardware store), a way to to adhere the mesh to the frame (glue or staple gun), hooks or decorative drawer pulls, and a hanging kit if you want to hang your organizer.  Optional, but if you have some duct tape, grab that, too.

DIY Jewelry Organizer Display

If you want to paint your frame, do that first.  After it dries, measure a length of mesh screening to cover the entire opening of the cutout, plus approximately 1-inch on all sides.  Affix the screen to the back of the frame using glue or staple gun (or in my case, a not-very-fancy typical office stapler).  Be sure to pull the screen as taut as possible.  When you’ve adhered all sides, you may want to go around the edges of the screen with duct tape to cover any pesky sharp edges.  (I forgot to photo that, but I’m sure you can picture it.) 

You can stop here if you’re happy to use your frame as an earring holder.  If you want to also hang necklaces or bracelets, add some knobs or hooks to the frame.  If you’re happy with how it looks, use the holes in the mesh to slip your hanging earrings through and you’re done!

Louisville Locals:  I will be hosting a picture frame jewelry display workshop at Good Garbage on January 26th at 4:30.  The cost is $20 and we will provide a wooden 18x15 frame plus all of the materials you need to create your own jewelry organizer.  Purchase tickets at Eventbrite: https://www.eventbrite.com/e/picture-frame-jewelry-display-tickets-9177898341.  I hope you’ll join us!

Happy organizing, DIY’ers!

~julee~

Wednesday, December 18, 2013

DIY Cork Wine Coaster and Bottle Tag

DIY Cork Coasters Wine Tag - Makes a great Christmas gift craft.

Is it a gift tag or a coaster?  It’s both!  These DIY cork coasters are a practical gift to give alongside a bottle of wine when attending holiday parties this season.  The upside?  You can make a whole batch of them in just a short amount of time. 

DIY Cork Coasters Wine Tag - Makes a great Christmas gift craft.

The most important thing you’ll need to make you own coasters is cork.  You can buy thin sheets or rolls of cork at the craft store.  (I purchased mine at Good Garbage.)  Then, you’ll cut circles out of your cork with a circle cutter or a circle template and scissors or exacto knife.  I made my coasters 4-inches.

DIY Cork Coasters Wine Tag - Makes a great Christmas gift craft.

Use paint or glitter to embellish your coasters.  Once you’re finished with  your design, use a standard hole punch to cut a hole for hanging and wrap it around the neck of your wine bottle.

DIY Cork Coasters Wine Tag - Makes a great Christmas gift craft.DIY Cork Coasters Wine Tag - Makes a great Christmas gift craft.

Alternately, you can make a whole set of these to give as a gift on their own.

Happy handmade gift-giving, DIY’ers!

~julee~

Thursday, December 12, 2013

DIY Felt Christmas Tree

DIY Felt Christmas Tree - Craft Tutorial

I saw some similar felt Christmas trees on Pinterest this week and immediately fell in love with their whimsical Dr. Suess-esque quality.  I thought they would be perfect to recreate for my coffee table which is sadly barren of any holiday decorations.  They fill the space quite nicely and were simple to put together.

DIY Felt Christmas Tree - Craft Tutorial

To make your own felt trees, you’ll need:  Felt, bamboo skewers, pom-poms, wine cork.  Start by cutting a 1-inch circle from your felt, and then continue cutting gradually larger circles (approximately 1/4-inch to 1/2-inch larger).  I used 11 circles for the large tree, 8 circles for the medium tree, and 5 circles for the small tree.  But you can definitely add more if you would like a fuller look.  Once your circles are all cut, skewer them on to the bamboo stick through the center.  Space out the circles to your preferred look.    Add a pom pom on top, and use a cork cut horizontally as the base.  To make smaller trees, cut your bamboo stick to your preferred size.  That’s it! 

DIY Felt Christmas Tree - Craft Tutorial

DIY Felt Christmas Tree - Craft Tutorial

Happy holiday crafting, DIY’ers!

~julee~