Showing posts with label easter. Show all posts

Friday, March 30, 2018

Kentucky Derby Easter Egg in Food Network Magazine

Kentucky Derby Easter Egg

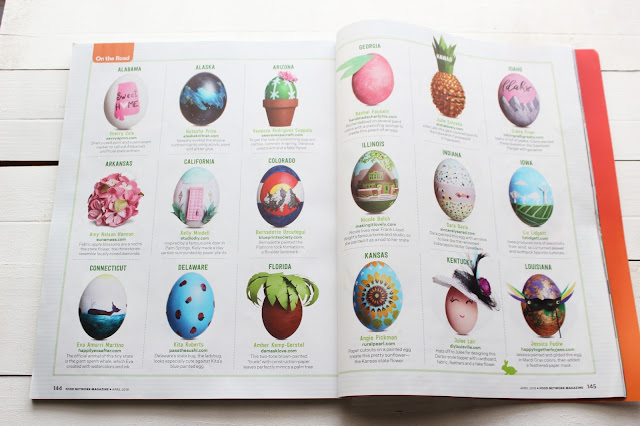
How do you represent Kentucky with an Easter egg? With a Kentucky Derby Chick, of course!

I was extremely honored to be invited to contribute the Kentucky egg for Food Network Magazine's United States of Easter Eggs feature in their April 2018 issue. 

Kentucky is many great things, of course, but I have traveled many places and know for sure that Kentucky is definitely one great thing to almost all across America and beyond: horses and the iconic Kentucky Derby. I created this little egg as a representation of that beloved culture.

Kentucky Derby Easter Egg

To create the Kentucky Derby Chick, I enlisted the help of my crafty better half, Craft E Magee, and we experimented with a few techniques to give us the perfect hat shape and size for an egg. Then, we did on a smaller scale what we've done together many times on a larger scale. we created the derby flair with feathers, silk flowers, and tulle. You can see the full tutorial on making the hat here: DIY Mini Kentucky Derby Hat.

Kentucky Derby Easter Egg

Look at all of these fabulous eggs representing The United States! I am astounded by the creativity of fellow craft bloggers. You can see each egg with links to all participating designers at foodnetwork.com/eastereggs.

Kentucky Derby Easter Egg

Which state egg is your favorite? It's hard for me to have a clear favorite when there are so many great designs!

Happy egg creating, DIY'ers!

~julee~

Wednesday, April 2, 2014

Candy Filled Paper Mache Eggs

Paper Mache Easter Eggs

What’s your favorite Easter treat?  I have a firm belief that all Easter eggs should be filled with chocolate.  These cute paper mache Easter eggs can be filled with small chocolates, jelly beans and fun trinkets.
Due the drying time on these, you’ll need to plan accordingly.  However, they have a good getting-your-hands-gooey vibe that kids love.  Plus, you have to rip them open to get to the goods inside.

Paper Mache Easter Eggs

Supplies Needed:  Water balloons, liquid starch, tissue paper.  Also, candy or trinkets to place inside.
Start by cutting your colored tissue paper into 1 or 2-inch squares.  If you’d like to add polka dots to your eggs, use several sheets of paper at once through a paper punch.

Paper Mache Easter EggsPaper Mache Easter EggsPaper Mache Easter Eggs

Inflate a balloon to your desired size.  Brush on liquid starch.  Leaving the balloon’s tie uncovered, wrap a solid sheet of tissue paper cut to size around the balloon to give it a solid base.  Brush on the liquid starch as needed to keep the paper on the balloon.  Then, add the squares of paper one by one around the balloon, again, brushing on the starch as needed to keep the paper down.  Do not brush hard or the paper will rip.  You’ll only need enough starch to affix the paper.  The more starch you use, the longer it will take to dry.

Paper Mache Easter Eggs

Once the paper is fully dry, use a pin to poke the balloon, holding on to the tie as it deflates.  The balloon should pull out easily.  From the hole in the top, cut a small slit in the balloon just large enough to place your treats.  Cover the slit with a small piece of tissue paper, and affix it with the liquid starch. 

Paper Mache Easter Eggs

To remove the treats inside, the paper on the egg must be torn.  Fun!

Paper Mache Easter Eggs

Happy Easter crafting, DIY’ers!

~julee~

Watch the video as I demo how to make paper mache eggs on WDRB in the Morning:

Tuesday, April 1, 2014

Egg Carton Easter Chick

Egg Carton Easter Chick

A little egg carton chick to hide some chocolate Easter eggs = Cuteness overload.  Seriously.  And while these egg carton Easter chicks are perfect for kids to put together, adults will have just as much fun helping – at least I did.  And the best part of all is that you probably already have all of the supplies needed for this one.

Egg Carton Easter Chick

Supplies Needed:  Paper egg carton, yellow paint, tape, colored paper, feathers (optional), black marker.
1) Cut two egg holder pieces (do these have a technical name?) from the carton.  2) Paint.  3)  Attach the two pieces together with a piece of tape to create a hinge.  4)  Use colored paper to make the beak, feet, and wings (or use feathers for wings, as shown).  5)  Draw on a pair of eyes. 6)  Fill with candy and give to your best peep.

Egg Carton Easter Chick

Happy Easter crafting, DIY’ers!

~julee~

Watch the video as I demo how to make recycled egg carton chicks on WDRB in the Morning:

Wednesday, March 20, 2013

Easter Crafts on WDRB in the Morning

Boutique Style Easter Basket #diy #easter #craft

This morning Craft E Magee and I demonstrated Easter crafts on WDRB in the Morning.   Participating on WDRB is seriously one of the most fun experiences we have ever had. 

I loved Kim’s boutique Easter baskets that she made last year, and I wanted to create one in the same style for my daughter this year.  She picked out her colors and I love how it turned out.  Here is the video clip of me demonstrating how to spruce up your plain Easter baskets:

WDRB 41 Louisville - News, Weather, Sports Community

Also this morning, Craft E Magee demonstrated her adorable Easter hand puppets. (Full tutorial and free printable templates found HERE).

Handmade Easter Hand Puppets #diy #easter #craftWDRB 41 Louisville - News, Weather, Sports Community

If you are in the Louisville area you can watch D.I.Y. Louisville and Craft E Magee on WDRB in the Morning again on April 3rd and April 17th at 7:45 & 8:15am.  You can also see our past segments on my YouTube channel.

Are you making any Easter crafts this year?  Feel free to share you links in the comments or post a picture on my Facebook page – I’d love to check them out!

~julee~

Friday, April 13, 2012

Insta-Friday

instagraminstagraminstagramIMG_0882

It’s been a real quiet week around these parts.  As I’ve said on our Facebook updates, I’ve been knee deep in wrapping up school projects as the semester ends.  Nonetheless, here are a few of the simple moments I’ve enjoyed this week:

~I love black cherry.  Love.Black.Cherry.  I picked up a pack of Virgil’s Black Cherry Cream Soda on a whim this week, and oh my.  I’ve been in black cherry cream soda heaven, and I’m not sharing with anyone.

~Do you play the cloud-shape game with your kids?  We had a beautiful drive this week with lots of big fluffy clouds to gaze at.  Those black spots in the pictures are not UFO’s out in the distance, but rather bug guts on my windshield.  How’s that for ruining a serene moment?

~Summer fruit, how my mouth waters for you.

~My daughter picked her favorite eggs to display on the table.  I love the one with polka-dots.  Do you eat your dyed eggs?  I don’t.  I’m easily grossed out thinking about how long they’ve been sitting around.  How long do you keep hard boiled eggs out?  I always hate when it’s time to toss them.

I’m linking up my simple moments over at Life Rearranged.

~julee~

Thursday, April 12, 2012

Easter

I’m sure by now you are past tired of all the Easter photos in blogland, but just because I am slow to get mine up doesn’t mean I’m not going to share.  We had a lovely Easter with my family joining us for brunch at our house and an Easter egg hunt, followed by dinner at my MIL’s house and much sitting and conversing around a bonfire.  I ate way too much, but it was sooo good.  I love Easter, all of the Spring colors and getting a pretty new outfit always put me in good spirits and this one was no exception.  Here are a few pictures from our Easter.
IMG_6770
The cutest kids all dolled up for Easter!
IMG_6769
Another one, because he is so cute in his old man cap.
IMG_6722
Egg hunting.
IMG_6713
I love this pink bottle brush with the little eggs on it. I purchased it at TJMaxx.  The jars were an idea I saw on Pinterest.
IMG_6708
This cutie woke me up at 7. 
IMG_6703
The Easter bunny was especially good to the kids this year.  One tradition in our house is that the Easter bunny always brings the kids their Summer shoes.
easter12
Homemade Easter candy on a vintage cake plate on a vintage tablecloth.

I hope you all had a wonderful Easter filled with family and friends.
-Kim

Saturday, April 7, 2012

Coconut Nests Easter Candy

Coconut Nests Easter Candy

This is the easiest last minute Easter candy recipe ever.  Ever, ever. 

Plus, they have a certain cuteness factor that will have your guests oohing and ahhing and calling you Martha in jest.  And isn’t that what we all want?

Coconut Nests Easter Candy

What you need:

1 bag (~5oz) Unsweetened Coconut Flakes

1 package almond bark

Candy eggs

1) Toast your coconut.  Spread your coconut in an even layer on a cookie sheet.  Put in oven at 300-degrees for 10-20 minutes, stirring every five minutes.  The amount of toasted-ness is a preference.  I like it real toasty and crunchy.  Less toasty keeps the coconut more chewy.  As long as you don’t burn your coconut, it’s all good.

Coconut Nests Easter Candy

2) Melt your almond bark.*

3) Add small drops of food coloring to your almond bark if you want pretty colored nests.  This is completely optional, however.

Coconut Nests Easter Candy

4) Add your toasted coconut to your melted bark. 

*I melt my bark in small pieces and add the coconut as I go.  The amount of almond bark you use will vary.  I like more coconut and less almond bark, but that’s just me.

Coconut Nests Easter Candy

5)  Spoon out your coconut/bark mixture on wax paper, making the nests as big or small as you want.

6) Allow nests to dry.  While the nests are still drying, add your candy eggs.  This way, the candy will adhere and won’t roll off.

Coconut Nests Easter Candy

7) Devour.

Coconut Nests Easter Candy

Happy Easter!

~julee~

and

--kim

Thursday, April 5, 2012

D.I.Y. Louisville’s Easter Roundup

If you’re looking for some yummy Easter inspiration for the upcoming Easter weekend, take a look at some of our favorite Easter treats:

bunnybutt2Bunny Butt Sundaes


easterpeepsEaster Peep Cupcakes


hopEaster Lunchbox Idea


pancakes2Easter Bunny Pancakes


How about you, have you been making any fun Easter treats? 

~julee~

Tuesday, April 3, 2012

D.I.Y. Boutique Easter Basket

easter
You may find this difficult to believe considering the amount of crafting I do, but my kids have been using those cheap, multi-colored Easter baskets for years now.  Every year when I get them out of storage I cringe and think “this is the year I will get cute ones” and then I don’t.  I always have a ton of stuff going on around Easter, I make my own candy and usually throw the big family Easter brunch, so making cute baskets gets thrown to the curb.  This year however, I was determined.  I thought if nothing else I would at least buy better plain baskets.  So after a trip to World Market with Julee I had some pretty nice, if plain baskets for a mere 4.99 each, with grass.  Gotta love World Market.  These baskets sat and looked at me for a good month waiting for inspiration to strike.  Finally during a sleepless night I got an idea.  I hit up Hobby Lobby the next day and bought some wide polka dot ribbon, a wooden letter for each kids initial and some pom pom trim. 
easter6
To make these I painted a strip along the bottom of each with white craft paint.  After that dried I used a hot glue gun to attach the pom pom trim right below the brim of the basket.  I wrapped some ribbon around the handle and secured with more hot glue.  Then I made a simple bow with the rest of the ribbon and tied it to the handle.  For the wooden letters I painted them white using craft paint and when they dried I added polka dots in colors to match my baskets.  To do this I used the eraser end of a pencil dipped in craft paint.  When the letters were dry I tied them to the basket with a little bit of twine. 
easter5
easter2
I love the way these turned out, cute and cheap.  Total for two baskets came in right at 20 dollars.  You could even do it cheaper if you bought your basket from the thrift and had some of the supplies on hand. 
What are you crafting for Easter?

Kim

Monday, April 2, 2012

Monday Magazine Challenge: Paper Mache Egg Diorama

DIY easter diorama

I went looking for an Easter magazine project this week, and my daughter picked this one from the pile.  Presumably because it has all of the elements she loves in a craft: messy.

This is from April 2009 Family Fun magazine, and you can still find the instructions for it online on their site HERE.  I wish I had thought to look up the project before we dove in, as reading the comments there may have saved us a few tears.

I’m  not going to retype the instructions, and I didn’t get any pictures of the process since my hands were completely covered in paper mache paste the entire time, so take a look at the link above if you’d like to know how we made this.  I followed the instructions almost precisely.

DIY easter diorama

My daughter and I both love the finished project, but I must tell you that the egg you see up there was my egg and my daughter’s egg did not survive the process.  Here are a few things to keep in mind if you’d like to try this DIY Easter diorama yourself:

~The magazine did not say that you would need two days to finish this project.  Even after sitting our eggs in the sun all day to dry, we had to leave them to dry overnight.

~Keep your egg on the smaller side.  My daughter wanted a bigger egg and she tuckered out after applying the first layer of tissue.   Also, the drying process tore her egg and it was unsalvageable.  The egg you see here is approximately 7inches tall, and although it also tore a little during the drying process, the tear was smaller and I was able to fix it by applying tape on the inside.

~Dipping the tissue paper in the paste and then applying it to the balloon was futile.  We developed a very messy method of dipping our fingers in paste, rubbing it on the balloon, applying the paper, and then rubbing more paste on top of the tissue.  Even then, there were a lot of tears in the paper and it was hard to ensure that we were overlapping the pieces.   It was near impossible to tell how many layers we had going on, so at some points you either needed to slab on some extra tissue paper or just hope that you had enough coverage. 

DIY easter diorama

The final product is really cute, so I’m glad we worked through the messiness and the setbacks.  My daughter enjoyed the final steps of cutting and decorating the window, and adding the decorations inside. 

(The little chicks were purchased at World Market and I just love them!)

Happy Easter crafting!

~julee~

We're sharing this project with the C.R.A.F.T. and Skip to my Lou linky parties.

******

Now it’s your turn to share your magazine project!

Monday Magazine Challenge is a new feature we are starting. You can read more about why we’re doing it HERE. A Magazine Challenge is any recipe, craft, DIY, tip, etc. from a magazine that has inspired you. If you would like to link to your own magazine challenge, please use the linky tool below. It would be mighty kind if you’d help us spread the word by linking back to us.


Monday, April 25, 2011

What I've Been Working On

I've been a busty bee lately so I thought I would catch you up on a few of the projects that have been occupying my time lately.

                 I made these cute Bit of Whimsy Violet dolls for Easter.  You can find the pattern here.

                                                    Some of my homemade candy for Easter.


                                                  Butter Pecan cupcakes and sugar cookies.

                                                Peep cupcakes for my daughters school.


I've also been busy at the sewing machine and with a paint brush.  Hopefully I'll finish those projects up and show them soon.  Hope you all had a great Easter!

-Kim